How To Open Properties On Mac For Usb
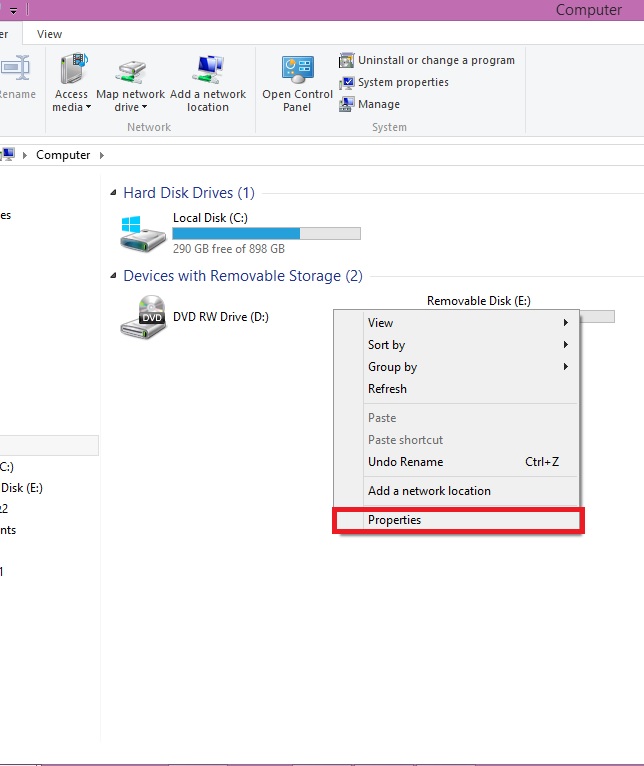
I am puting this tutorial after a failed attempt at installing ubuntu using a Flash drive as a BOOTABLE device. Then I gave up on the Ubuntu dream, almost! But I could not reuse my Flash drive normally as a storage device after this process. I went through a bit of trouble searching the web (could be easy for you and you do not need to read this). I found this If you do not wanna waste time going through my unnecessarily long steps, here are the short steps that helped me: 1) Insert the USB flash drive into the USB port. 2) Click Start, type devmgmt.msc in the Search textbox and press Enter.
3) Find Disk Drives and expand it. 4) Find the USB flash drive you want to format, and double-click it. It opens the Properties dialog box. 5) Click Policies tab. 6) By default, the Optimize for quick removal option selected, switch it to Optimize for performance and then press OK. 7) Now open Computer. Right click on the USB Flash Drive and select Format.
Click the cartoon face Finder icon on the Dock of your Mac to switch to the Finder. Click the folder with the properties you want to see. Click “File” from the Finder menu, then click “Get Info.” A window appears, listing the properties of the folder you selected. Follow these steps to check on the NIC hardware: Open the Control Panel. Open the Device Manager. In Windows 7, choose Hardware and Sound, and then choose the Device Manager link beneath the Devices and Printers heading. In Windows Vista, choose Hardware and Sound, and then choose Device Manager.
Just bought a new my passport for mac. light blinks. is that ok?. Come to find out, when I decided to update my internal hard drive on my Mac Pro, I had to buy a SATA, IDE, USB 2.0 adapter to back up the internal and transfer to the new internal. Long story short, something said, Hey try and open the Lacie and bypass the board in the enclosure and connect directly to the Western Digital drive inside. I got my info, so all I need is a new enclosure. I took it to my apple guys and they said that I needed to go to a data recovery service which would cost a gang of money.
The Format dialog box now appears. 8) Select NTFS in the File System field.
9) Press Start and wait while the process will be completed. Edit: Every time I need to install ubuntu and restore my flash drive (which happens quite often for me at work), I follow your instructions! To my knowledge, this is still the fastest and easiest way to restore a flash drive!
Create a chart with a benchmark line in excel for mac download. Useful when creating excel dashboards and you want to include a threshold line/target value for your indicators.
I followed your 'quick instructions' up at the top and the only thing that confused me for a second is that when you say 'Computer' in step 7, I thought at first you were referring to the 'Computer' tab in the device manager. However, you are referring to what shows up in the file manager as 'This PC' (at least that's what it is for me!). Might be worth clarifying! Overall this is the easiest and fastest way I have found to revert a USB back to a storage device from being a bootable device.
USB-C describes the shape and style of a port on your computer and the connectors that you can plug into the port. USB-C ports look like this: Several different data transfer standards, like USB 3 and Thunderbolt 3, can flow through a USB-C port and connector. You can also connect your computer's AC power adapter to a USB-C port with a.
USB-C ports are reversible, so you don't have to worry about which side of the connector is up when you plug it in. These Mac computers have Thunderbolt 3 (USB-C) ports that support USB 3.1 Gen 2 and Thunderbolt 3: • iMac Pro (2017) • iMac (Retina 5K, 27-inch, 2017) • iMac (Retina 4K, 21.5-inch, 2017) • iMac (21.5-inch, 2017) • MacBook Pro (2016 and later) These Mac notebooks have USB-C ports that support USB 3.1 Gen 1: • MacBook (2015 and later) You can use your USB 3 devices with the above Mac models using an.
Try these tips if a USB 3 device doesn't activate or appear on the USB 3 bus: • Be sure you've installed the latest software updates available for your computer. To check, choose App Store from the Apple menu and see if any updates are available.
• Sometimes unplugging and plugging the device back in can resolve the issue. • Try plugging the device into another USB port on the computer. • Check to see if a firmware update is available for your device from the manufacturer. • If the device came with an AC adapter, use it. • Restart your computer.
• Try a different USB 3 cable. • Try a different USB 3 hub.
Some USB 3 devices can generate radio frequency interference that can cause Wi-Fi and Bluetooth devices operating in the 2.4GHz band to have issues communicating with your computer. Here are some tips to avoid this issue: • If your USB device has a cable long enough that you can move the device, place it away from your Mac—and make sure not to place it behind your Mac, or near the hinge of its display.
The antennas for Wi-Fi and Bluetooth are located there, and USB 3 devices placed there might interfere with your wireless connections. • If you're using adapters or dongles on a Mac computer with Thunderbolt 3 (USB-C) ports, plug them into the front port on the left side of your Mac, or into the ports on the right side (if your computer has them). These ports are the farthest away from the antennas, making interference less likely. • To avoid interference on the 2.4GHz band using Wi-Fi, try using the 5GHz band instead. You can change this on your wireless base station.
Bluetooth always uses 2.4GHz, so this alternative isn't available for Bluetooth. Information about products not manufactured by Apple, or independent websites not controlled or tested by Apple, is provided without recommendation or endorsement. Apple assumes no responsibility with regard to the selection, performance, or use of third-party websites or products. Apple makes no representations regarding third-party website accuracy or reliability. Risks are inherent in the use of the Internet. For additional information. Other company and product names may be trademarks of their respective owners.