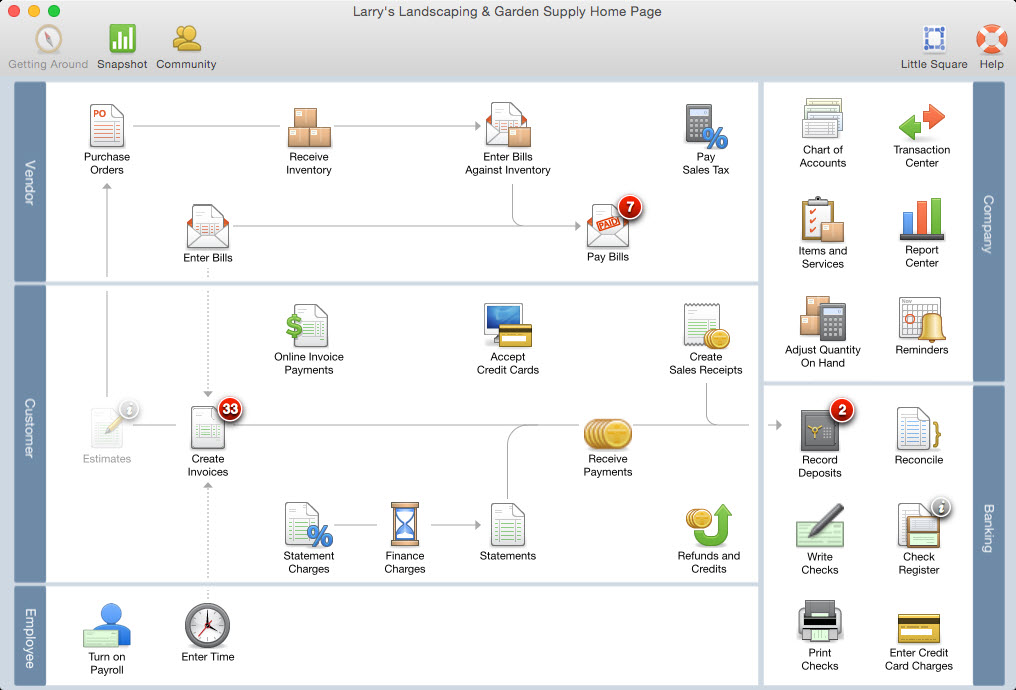
Quickbooks For Mac Homepage
QuickBooks Mac is locally-installed software. You can purchase a QuickBooks Desktop for Mac license for $299.95 directly from Intuit. The software can also be bought from resellers like Staples, Best Buy, or Amazon.
INTEGRATION WITH OTHER SOFTWARE • Export report data requires at least Apple Numbers v3.5, and/or Microsoft Excel 2016 or later, including Office 365 for Mac. • E-mail requires Apple Mail, Microsoft Outlook 2016 or later, including Office 365 for Mac.
• QuickBooks Desktop for Mac 2019 supports one-way conversion to QuickBooks Online. • QuickBooks Desktop for Mac 2019 supports one-way conversion from QuickBooks Desktop Windows 2016 to 2018. • QuickBooks Desktop for Mac 2019 supports conversion to and from QuickBooks for Windows 2019.
• From the Home tab, under Related Activities, select Want to export to QuickBooks? Set up export preferences.
The new calendar will be added to the panel on the left; Having trouble? Open Outlook Calendar; Click Open Calendar and select From Internet; Click New Calendar Subscription; Copy and Paste the link below, then click Subscribe; Outlook for Mac does not support dynamic calendars. We recommend texting the calendar to your mobile device. Nfl schedule for mac calendar. Just in time, here’s the NFL Post-Season Calendar for iPhone and Mac.It has dates, times, teams, and TV channels (and it will update to show the scores, and the schedule for future games).
Alternatively, from the Account Settings tab, select Set up now in the Export to QuickBooks section. • Select QuickBooks for Windows or QuickBooks for Mac from the dropdown. Windows: Choose QuickBooks for Windows > Export my Full Service Payroll information to a downloadable IIF (Intuit Interchange Format) file. Mac: Select QuickBooks for Mac. • Select which QuickBooks accounts to export to.
Important guidelines for account selections: • You have 3 options for mapping expenses accounts: By item type, employee type, or employee name. Liability accounts do not have these 3 options. • Use only alphabetical characters and numbers in account names. If you have special characters listed in your account names in QuickBooks, you will need to remove them in order to successfully export from Intuit Full Service Payroll. • If you use subcategories or subaccounts, use a colon to separate the category name from the subcategory, for example: Payroll:Gross Wages (no space before or after the colon) • If you use account numbers in QuickBooks, do not enter the account number in the account name. • If using a cash advance or employee loan deduction, enter an asset account.
• If you use Cost of Goods Sold (COGS) accounts for expense accounts, please contact Payroll Support to enable this functionality for you. The following set of screens are the available mapping options: Bank Account: Wage Expense Accounts: All other accounts: • Once you've reached the Review page, review your mapped accounts for accuracy and then click Finish! You will use the Export Preferences page to enter your QuickBooks accounts.
Use the exact same names of the QuickBooks accounts you will use for the payroll data. • Select the Setup tab. • Under the Export heading, click Preferences.
• Select QuickBooks for Windows (IIF) from the software drop down list. • Select Next.
• In the Checking Account box, enter only the name of the bank account exactly as it appears in QuickBooks. • Select Customize to enter the account names exactly as they appear in QuickBooks. • When entering accounts, read the help topics next to each field to choose the right account type. In general, enter an expense account for the Wage and Tax Categories. For the Liability accounts, enter the corresponding QuickBooks Liability account. • If using a cash advance or employee loan deduction, enter an asset account to receive the payroll data • If you use different accounts for different groups of employees, select that option in the wage/tax category section to enter QuickBooks accounts for each employee.
• If you use different accounts for different types of wages/taxes, select that option in the wage/tax category section to enter QuickBooks accounts for each pay type and tax type. • Specify whether you use classes in QuickBooks for employees. • If classes are selected, you can enter them on the next page after clicking OK at the bottom of this page. • If you want to print checks using QuickBooks, select I will print paychecks using QuickBooks.
• If your employee has a direct deposit payment with the balance dispensed via paper check, see for info on how to properly pay your employee. • Select OK Import to QuickBooks Desktop.
• Windows: From QuickBooks Desktop, choose File > Utilities > Import > IIF files. • Mac: From QuickBooks Desktop, choose File > Import from IIF.